Siebel Shortcuts!

I prefer most of the things to be automated on my machine and same thing as with siebel. I think most of developers prefer it that way.

In this post i am sharing how we can automate Siebel on our machine and some easy to use shortcuts that can be really helpfull if used.


1. Using automated log in to Siebel Tools and Web client.

It is very boring to enter our same credentials every time we open our Siebel Tools or web client. By using the command line switches provided by siebel we can automate this login process.


See the screen shot showing how we can automate SADIN login to siebel tools for sample database.

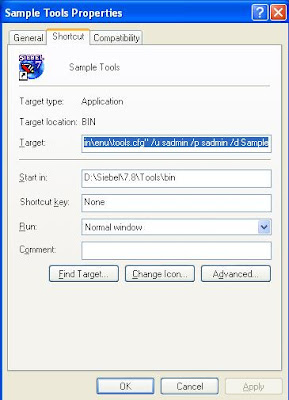
Similarly for Web client we can have similat auto login. This way you can create mulple icons for multple dbf's .. These icons when clicked will take direclty tools or web client without any need to log in.


2. Automated login to Siebel Thin Client
Usually most of developer adds thin client URL in IE's favourites. We can also customise this URL to take us direclty to the aplication without showing the loging screen.


Just Add following string after the Thin Client URL and save the as bookmark

start.swe?SWECmd=ExecuteLogin&SWEUserName=[User Name]&SWEPassword=[Password]

Next time you will click this bookmark ... Browser will automatically show the logged in screen.

3. Bookmarks
Siebel has provided feature in siebel tools very similar to favorites in Internet Explorer. We can bookmark any view that we have queried and drilled down in siebel tools, and later in future if we want to go back then we just have click on that bookmark and then tools will show the view exactly where we left it.


Bookmark works on every screen except Workflow Editor View and Script editor view.
4. Other Usefull Shortcuts:
Siebel Tools:
Cntrl +F7 --- Srf compile.
Cntrl+F10 -- Check In Object
Cntrl + E --- Hide Unhide Object viewer
Cntrl + Shift + F9 -- clears all the creak points

SIebel Client:
Alt+Q -- Query
Alt+R -- Refine Query
Cntrl + Shift +X -- -log out
Cntrl + Shift + A --- Go to Site Map
Cntrl + W -- Immediately Kills Active Window.(Use it when going back home :) )
F2 -- Open Pick applets and MVGs
Cntrl + Arrow Up -- Prev Record
Cntrl + Down -- Next Record
Alt + Down -- Next 20 records
Alt + Up --Prev 20 records

Cntrl + 8 -- When siebel client hangs this shortcuts brings back the control to IE, and then you can submit the new requests.

Coming up : Automation of daily siebel server admin tasks.

Editing conflict page of Siebel Product Configurator


Rquirement:To remove proceed button from the conflict page of Siebel Product Configurator.

Background 
Siebel Product Configurator throws and error page commonly known as Conflict page(see below) to the user when user tries to select wrong configuration inside the configurator.


In conflict page user have uption to undo his last action or proceed by removing the object that was constraining his last selection.


Some times objects are added by configurator scripts, and it is required that user should not be able to delete the products or attributes that are added from scripts. 


Solution
This problem can be solved by editing the cfgui.js javascript file .

This file constains javascript code that renders the whole UI of product configurator.The script in the file contains methods that convert the swe tags of the templates file to the HTML tags that shows up as UI.  You can find this file in the public\lang_code\siebel_bulid_number\SCRIPTS directory of siebel web client installation.

On the siebel server these files can be located in the SWSE\PUBLIC\lag_code\siebel_build_number\ SCRIPTS folder

To remove the Proceed button you need to edit the showConflict funtion in this file, to set the display property of proceed button to none.

from script:

switch (conflictType)
   {
      case "Conflict":   
         buttonObj = document.getElementById ("RemoveFailedRequests");
         if (buttonObj)
            buttonObj.style.display = "";

to :

   switch (conflictType)
   {
      case "Conflict":   
         buttonObj = document.getElementById ("RemoveFailedRequests");
         if (buttonObj)
buttonObj.style.display = "none"; 

After these changes, clear the cache of internet explorer and restart the client. Now on proceed button will not visible on the conflict page of the configurattor(see below).


Removing vanilla buttons from the Product Configurator UI

Requirement:
Remove vanilla buttons from the configurstor UI.


Solution:
Solution doesn't involve any configuration in Siebel tools or compilation, it requires editing of the confgirator vanilla template files directly.

Buttons like Done , verify, reprice etc are displayed on confgurator UI as a part of  eCfgTopLevelButtonsJS.swt  template file. 

Buttons in this file are displayed inside the table cells and luckily there not much of css style attached on them.  

So to remove the buttons we can define a style property for each cell that we want to remove. style="display:none"


For Example to remove the Save button from the UI, you need to change the code from :

<td nowrap>
<swe:control id="swe:Cancel" CfgUIControl="Cancel" CfgHtmlType="MiniButton" InvokeMethod="PrevView"/>
</td>
to:

<td nowrap style="display:none">
<swe:control id="swe:Save" CfgUIControl="Save" CfgHtmlType="MiniButton" InvokeMethod="SyncInstance"/>
</td>


Browser Script on fly!

This was almost a year ago, myself along with Neel and other team members were working on product configurator and found vulnerability in the siebel browser script.

Like other web applications, In Siebel also we can inject some javascript in page to extract details or modify some element.  But as siebel has provided access to the theApplication() object in the  browser script.  We could access it in script in address bar. 

Once this object was availble, we were able to set and get profile attribute at any view in the siebel session.


That's not all !!  Siebel script engine doesn't defferentiate between a browser script and server script. The only difference is that in browser script user can only work on the objects that are shown on the current UI.

This means that we can edit the read only fields, those fields that were made readonly at applet level.

I digged some more and uploaded some scripts that can be used readily in any application. 

Try one of the followings: 
(Open siebel application and copy paste the content in the address bar and click GO.) 


1. 

2.


3.


Receiving messages from JMS server

In JMS Integration, External System and Siebel doesn't send messages directly to each other. First the messages are placed on queues of the JMS Server, receiver system queries these queues for new messages when required.

For such and implementation siebel provides out of the box receiver server components, that are needed to be configured according to our requirements.

This receiver component executes the ReceiveDispatch or ReceiveDispatchSend method of EAI JMS Transport business service to get new message from queue.

These methods queries the JMS Server and checks in the queue for any new messages. If any message is found, this component invokes a workflow specified, and passes the received XML as input argument.
The name of the workflow is specified in the Data handling subsystem which is of type EAITransportDataHandlingSubsys.

Queue information is stored in Receiver Connection Subsystem that includes the queue name and the credentials.
Wrap up:
Receicver component (Type Enterprise Application Integration Receiver) requires:
1. Receiver Method Name (ReceiveDispatch/ReceiveDispatchSend)
2. Receiver Service Name (EAI JMS Transport)
3. Receiver Connection Subsystem (Contains queue name and credentials)
4. Receiver Data Handling Subsyst (Contains reveive workflow name.)

Setting up Siebel and JMS Integration!

Recently i attended a knowledge transfer session of EAI.  I learn few thing, that i think are worth sharing. In this project all the interfaces were built on JMS queues, provided by TIBCO.

One must not get confused with TIBCO Integration platform and JMS. TIBCO is a provider that have two products, one with JMS queues and other with TIBCO propriety protocol.

I am listing the tasks that are required to setup JMS queues so that your workflow can send /receive messages from the JMS server.

Steps required for sending asynchronous messages
1. Install JRE on all the siebel servers that runs object mangers and policy components.
2. Collect Api in from or jar files from the provider of JMS and place it in a shared location
3. JNDI properties file (this file contains the location and credentials of the JMS sever)

typical JNDI file will look like:

java.naming.factory.initial=com.tibco.tibjms.naming.TibjmsInitialContextFactory
java.naming.provider.url=tcp://ipaddress:port,tcp://fallback-ip address:port
java.naming.security.principal=
java.naming.security.credentials=


4. Java Named subsystem (type JVMSubSys)this information provides link between Siebel and the Java installed in the system.

Thus it requires information of the Java API that is java.dll. Which was installed as a part of Step 1.  And the location of the the jar files in the CLASSPATH parameter.Additionally for debugging purposses we can provide the log file path in VMOPTIONS parameter. 


After this much configuration in siebel you can use the EAI JMS Trasport business service only to send  messages accross the JMS server.(Dont forget to send queue information and credentials as arguments)


Coming up! Receiving messages from JMS server

Structure of Siebel Products

Before starting with the creation of siebel products , one should be familiar with the strucutre of products.


I have tried to depict it as a diagram. A product modelled in siebel is composed of Attributes (which are inherited from the product classes) and child products that have thier own set of attrbutes and can have their grand child products also.

This whole structure is created using products relationships and classes. Scripts and Constraints control the way the user can select the product and order it.

At first look it seems to be very simple. But it needs lots of configuration to show a product inside the configurator and enforce all the business rules in it.

I will take an example of an a dummy product and show how to configure it from modelling to Displaying it on UI in my coming posts.

Exploring Siebel Product Configurator

Siebel with version 7.x drastically changed Order Management and product Configurator by introducing a new GUI based Product Configurator and catalog management processes.

For those who are completely unaware of this new terminology should look at Neel’s Blog for a beautiful explanation. It is basically a tool that is built inside the Siebel that allows users to configure the product using graphical interface. It enables user to configure the products based on business rules and moreover the product compatibity rules.

For Example If a product is visible to a partner and hidden from other then it’s a business rule. But there are some rules specific to the products. For example if user is configuring a notebook computer then he must buy power supply compatible to the model selected, or if user have selected Windows Vista then computer must have at least 2 GB memory in it.

Product Configurator is closely coupled Siebel Pricing engine. It helps to show the price of the product inside the Configurator immediately on selection of any product in the Configurator.

Before going in to detail of configuration one can refer Neel’s blog part 2 on product configurator.

Few words of caution for new Product designers:
1. As divisions in Siebel, product are once created can’t be deleted in the Siebel although they can be made hidden in the application.
2. They are completely built inside the Siebel Client, not in Siebel tools.
3. They are migrated from one environment to other using Workspace import export utility.
4. To make any product visible in the system (visible in the pick applets), designer must release product once and end date of release should be valid.
5. There are several ways to make product hidden in the system, one of them being the orderable flag. If it is unchecked product won't be visible in the pick applet across the applications.


Next Post: How to create and configure products in Siebel?

Introduction to Siebel 8 Task Base UI

Task base UI is one the most talked about feature of Siebel 8.  In this presentation Scott Nash from oracle is explaining the need and the facilities that task UI Provides. 


Coming Up : Building Task UI in Siebel 8

How to use output of Business Service Simulator?

If you have ever developed business services and workflows you must have definitely gone to Business Service Simulator View, to test or simulate business services or workflows.

But have you ever wondered that can we use the output arguments of the simulation again as input to the next simulation?! Even i didn't really thought about this earlier, until in Acceptance test of our project i needed to reproduce the behavior of one my workflow in controlled manner.

At that time one of my colleague suggested me to use Move to Input in built functionality of the Siebel Business Service Simulator.

Lets see how it is done:

1. Go to Administration Business Service Screen and Simulate the first service.


In my case I first simulated EAI Siebel Adapter Service Query Method to generate Siebel message..


2. You will then see a record created in the grandchild Applet containing the output properties of the business service. Now if you want to use this output as input to another business service then there is one way to copy and paste value into the input or to use Move to Input button!!!

This button copies the output property set record to the input, and then these can be used to simulate another business service.see screenshot:


This is becomes very useful if our service is expecting derived inputs. By use of this we can simulate certain steps of workflow on the run.

Please let me know if it helps anyone. :)


Other Siebel Blogs

siebel-admin-l @ IT - toolbox

siebel-dev-l @ IT - toolbox